Sunday, May 27, 2018

Assignment 3 Intro!

Hi All,

It's our last class this week ... and the introduction to Assignment 3!

Assignment 3 is due on the 13th of June by 23:59: it's called Reflection.

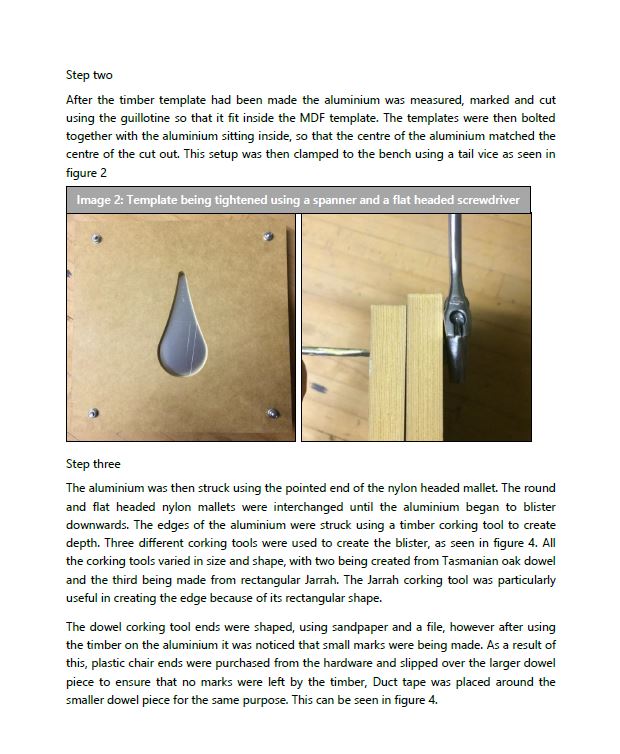
Rabbit (1986), Jeff Koons

You need to choose one of your projects and critically review it using images, video, text and drawings to reveal strengths, weaknesses and alternatives to your approach, techniques and tools.

You could approach this in three ways (separately on in combination):

Through contrast and comparison. Comparing and contrasting elements of your work as it developed over the semester with previous examples of your own work or the work of your classmates.

Through reflection on your discipline. How are the skills you've learned useful, not useful, challenging to previous was of doing things, changed your point of view regarding another discipline, similar or different to a classmate from the same or different discipline, etc. etc.?

Through demonstration. Having another attempt at something you were not so successful at previously or something you did well but could do faster or more efficiently the second (or 6th) time around.

Pay close attention to the Feedback and Review Sheet. Some of you fell down in assignment 1 because you didn't address the specific criteria outlined there. Ask any of the tutors on Wednesday if you have any questions regarding how best to address any of the areas you are being marked on.

Regards

Russell
Daniel
Martin
Gabe
    

Tuesday, May 22, 2018

Final Class for Assignment 2!

Hi All,

Tomorrow is the last class for shaping your third of the fuel tank in aluminium sheet.

All four of us will be available from 2-5pm to give you advice on shaping and review any material you have for documentation.

You'll need to gather your documentation and submit it to your blog by 23:59 tomorrow evening.

Take a good look at the below, take a deep breath, and go for it!


Next week we are on the Assignment 3.

Regards

Russell
Daniel
Martin
Gabe

Monday, May 14, 2018

Class this week

Hi All,

In class this week you'll be continuing to shape your third of the fuel tank you've been working on as a group.

Keep in mind you only have this week and next week to work on it in class time as you'll be submitting the complete documentation by midnight next week.

Looking at the quality of documentation shown in the sample projects from assignment one, in the last post, will help you understand what we expect for assignment two and three.

See you in Class!

Regards

Russell

Top work from Assessment 1

Hi All,

Take a look at some of the top work from assessment 1:


I could have shown a few more, but these give you an idea of where the standard is for the second and third assignments.

Regards

Russell


Sunday, May 6, 2018

3ds Max modeling tutorials

Hi All,

I showed some 3ds Max modeling techniques to students in class last week ... here are some video tutorials I've made going over the same techniques and some others you might find useful:


The Bead Roller

Hi All,

I brought one of my tools in from my home workshop for you to try out; its called a bead roller.

Take a look at this demonstration of a machine very similar to mine:


And another demo showing how to tip an edge that goes around a curve (you can think of the bead roller as a metal folder that can do curves as well as straight lines):


And while you might use the bead roller to tip the bottom edge of your fuel tank panel or add a sharper highlight line the image below shows how you might use the bead roller to create a contour model in landscape architecture or for architectural models:


See you in the workshop on Wednesday!

Regards

Monday, April 30, 2018

Pattern making

Hi All,

Pattern making is the process by which you use paper or lightweight cardboard to get an approximation of the dimensions of the panel you are going to shape and a preliminary understanding of the processes you might use to shape it.

We use paper or lightweight cardboard because it operates much the same way the aluminium does, it only stretches when you put cuts in it and only shrinks when you put a tuck or pleat in it.

The first 8 minutes of the video below shows Christopher Runge discussing the pattern making techniques he uses when building his custom cars: 


The hood scoop showed in the explanation by Lazze below is closer to the shapes you will be making in BEIL0014, so worth a look for that reason alone:


We look forward to seeing your 3d templates in class this week!

Regards

Sunday, April 15, 2018

Intro to Assignment 2: The 1:1 Fuel Tank

Hi All,

Assignment 2 is worth 40% of your overall course grade and needs to be submitted by May 23rd,  23:59.

In multi disciplinary team's of 10 you will create a 1:1 scale template replicating one of the motorcycle fuel tanks supplied. As individuals you will then create an aluminium skin to adhere to a third of its contours.


Steps:

1. Form groups of 10; ensure they have a mix of disciplines.
2. Choose one of the fuel tanks; pay attention to the assessment multiplication factor!

These will be in class today, and you can download the digital model by Andrew Wallace here.


3. Use Photogrammetry or Rhino/Grasshopper techniques to create a 3d model of your chosen fuel tank.
4. Use Autodesk Slicer for Fusion 360 to prepare your fuel tank template for laser cutting or CNC machining.
5. Assemble your template.
6. Individually, create patterns that will enable you to shape an aluminium skin to adhere to a third of the fuel tanks contours.
7. Shape your third of the whole fuel tank.
8. Place your third on the template and record your success!
9. Team up with two other students from your group to record the fully skinned fuel tank.


Harley 883 Iron

Yamaha IT250

Custom tank for a CB550: Andrew Wallace


Sunday, March 25, 2018

The Blister

Hi All,

This week we'll be using a female hammer form to create a shape that could be used to streamline a part that protrudes from a larger overall shape; its called the Blister.

Theory, Russell:

In hammer forming you'll often see two sheets of wood clamped together. On occasion you'll see the sheets bolted together, with the bolts also passing through the metal. This is what is shown in the image below:

Sonia Cunningham's Blister from the top and bottom and out of the form

Paige Kodesh, a BEIL0014 student from last year, wrote a great tutorial on how to create a blister using this method and included some possible applications. See that here.

Paige Kodesh's step by step images that accompanied her tutorial.

Follow this link to see the steps another person went through to achieve a much more complicated shape and finished result below:


Finally, think about creating some tools from scrap wood so you can get into the tight ends of the teardrop shape.

This image shows a corking tool for getting into the edges that you cant reach with an ordinary hammer (note wood also doesn't mark the material up like metal tools do, saving you time in the long run).


CNC Cutting, Edward Iverach:

The faculty has two full sheet CNC cutting machines in the design lab. Edward Iverach is our local expert on setting them up and cutting files. You can download a copy of the files we will be cutting here. If you have other shapes you'd like to cut for other projects make sure you talk to Ed before preparing the files so you have the best chance of success!

Cutting using the digital Table Saw, Martin:

Martin will demonstrate the new digital table saw we have in the workshop when he cuts the full sized sheets down to manageable pieces.

Corking tools, Gabe:

Gabe will demonstrate various workshop tools and techniques for creating corking tools that can be used to fine tune your work.  

Metal Shaping, Daniel:

The video below is an excellent demonstration of hammer forming and shows how the sheet metal is clamped to a form so the material doesn't move when you are hammering into it.


You'll see why we will be using a thick sheet of wood on both the the top and the bottom of the work piece (so we don't get the wrinkles he gets). In his case the wrinkled part is going to be cut off so it wasn't a problem; so keep that in mind if you'll be doing the same in the future. This crafts person has a lot of videos, well worth watching.

The person below uses a modified air powered rivet gun to speed up the process.


Tuesday, March 20, 2018

The Tray

Hi All,

You'll be working in pairs to create the Tray in today's class. 


Theory, Russell:


The Tray is an open box shaped form which has radiused corners so that the edges can be turned up continuously around its whole perimeter.


You can see the development of the tray in Sonia Cunningham's work from last year here.   


The main technique we will be using is called Hammer forming. In this case we will be hammer forming around a male buck.  


In the video below you can see a very heavy steel hammer forming buck. It consists of two parts that are clamped together. The bottom one is your goal shape and the top one follows that shape but is usually a bit smaller. The purpose of the top shape is to clamp the material in place so it doesn't move when you are striking it or lift up in the opposite direction to your blows so that the edge is less sharply defined.


As the demonstrator below works along the edge you can see the tucks that form on the outside radius (where the aluminium is shrinking). It's almost impossible to see the stretching that is happening on the inside radius; but it is happening and his advice regarding starting from the top and working down to avoid splitting the aluminium is evidence for the stretch.


Our hammer forming buck will be made from scrap timber that you can find in the workshop. While not as strong as a steel buck timber is usually fine when forming soft aluminium or when you only have a few parts to make.

Follow these steps:

1. Find a student from a different discipline, or different year in your discipline, or someone who you haven't met before.


2. Jointly determine the length and width of your trays (we recommend a maximum dimension of 220mm in the long dimension).


3. Jointly determine the corner radius of your trays. This will be driven by the size of the dolly you can find or make.


Note: there are a collection of steel disks/cylinders in the metal workshop that you could use as dolly's, but you might make your own out of timber. Keep in mind larger radius's are easier to form. 


4. Individually determine how far the edges turn up on your tray. Keep in mind the further the edge turns up the harder it is to form the radius's on the corners. Turn the edges up at 90 degrees from the base.

5. Once finished place your trays so that the open edges on each tray touch ... they should match perfectly. Use still images and video captures to demonstrate your skills.


Marking Out, Martin:


We have provided a template to laser cut that you can use to help mark out your tray and your bucks (the zip file contains an Adobe Illustrator file and an AutoCAD file, both are the same).

See if you can figure out our recommended dimensions by analyzing the completed template.

Mark your tray out on the aluminium. We recommend you cut your aluminum sheet to the outside size on the guillotine and trim the corners with the aviation snips. Debur the edges. Use a engineers square and scribe to mark the lines in the aluminium. 

Here is a suggested procedure:


Cutting and shaping the hammer forming buck, Gabe:

Mark out some pieces of flat timber with a pencil or pen to use as your hammer forming buck. Cut with the band saw or ask for assistance with the new table saw. Use the sanders to clean up your radiused edges.

You could also create some implements for hammering the edges down. You hold the implement between the hammer and the aluminium like a chisel. Their purpose is twofold; to enable getting into tight corners and turning any lump of material into a hammer (with a soft, un-marking face). The tools made from timber and nylon to the bottom left of the image below are what we mean. The two wavy shapes are hammerforms and you'll recognize the mallets.


Folding the edges and Turning the Radius, Daniel:

Clamp the aluminium between your two pieces of timber and slowly work your way around the perimeter until the edges turn down at 90 degrees to the base. Follow Daniel's advice and the advice from the video above to avoid creases at the corners.

Wednesday, March 7, 2018

The Torus

Hi All,

In week three we will be making the Torus. And a Ferrari!

Theory, Russell:

A Torus is a shape defined by two circles. It has a revolved radius and a ring radius.


The revolved radius is indicated here by the letter 'b" the ring radius is indicated by the letter "a".

In metal shaping the Torus is a shape known as a Reverse Curve. In contrast to the curves of the Bowl, which go in the same direction, in a reverse curve the curves of the sections at 90 degrees go in opposite directions; you can see this clearly in the image by Sinead Martin below ...


Sinead Martin in the final stages of planishing her reverse curve.

Imagine your 240mm x 120mm piece of aluminium being divided into three strips along its length. To achieve the reverse curve the long outside edges need to have more area that the inside strip. You can achieve this is two ways, by stretching the outside edges or shrinking the inside strip. Daniel will demonstrate a technique for shrinking the inside strip and Gabe will demonstrate a technique for stretching the outside edges. 

If you are ambitious you can also turn the outside edges back around to make the shape look even more like a Torus, seen here in an image by Sonia Cunningham:

    Sonia Cunningham's reverse curve with the outside edges rolled over. 

Option 1, Shrinking the center strip: Daniel

Daniel follows the method described by Wray Schelin which uses a depression carved into the radius of a stump to shrink the center. You create a fold around the outside which traps the aluminium as you work back towards the center. This works like a three dimensional tuck (as opposed to the two dimensional tuck of the Bowl). The metal doesn't like to cross over fold or crease around the outside edge because the aluminium sheet is stronger there because of the fold/crease.  


Option 2, Stretching the outside edges: Gabe

In this option Gabe will use the English Wheel to stretch the outside edges. It's a bit slower, but quieter and more controlled. This technique is good for making subtle curves.


Option 3, Stretching the outside edge using the Shrinker/Stretcher Tool. 

We won't demonstrate this technique, but we do have a Shrinker/Stretcher in the workshop so I thought you might like to see it in action. This method leaves marks in the aluminium and can tear the aluminium easily. Having said that, in some situations (turning short flanges for example) it is your best option. See Lazze demonstrate this below.


Making a model Ferrari, using Slicer: Martin.

This is how you'll make the template for the motorcycle fuel tank in the second half of the course. You can download a model of the Ferrari 250gto yourself and experiment with different ways of configuring the software to create a template for shaping the aluminium panels. It's an incredibly powerful piece of software and very useful for quickly prototyping your digital designs; see the demonstration below to see it in action:


You can download Slicer for free through the Autodesk student portal. 

I would also highly recommend Fusion360 ... it's a modeling software that is easy to learn, fully parametric and links directly to manufacturing through 3d printing, CNC machining and laser cutting. It'll take your digital modeling to a level beyond Sketchup!

https://www.autodesk.com/education/free-software/featured

Enjoy!


Russell


Monday, March 5, 2018

The Bowl

Hi All,

The Bowl is our first shaping exercise.

Theory, Russell:

There are not many things you can do to a metal sheet to transform it into a complex shape: you can cut it, you can bend it, you can shrink it and you can stretch it. All of these processes change the overall area of the material you start with. Bending won't change the area much at all (practically speaking you can assume it doesn't add area for the work we are doing), but shrinking and stretching can change the area substantially.

Recalling from last week; if you add area to a sheet of material it has to go somewhere, and if you add the area in the middle of a plane the material surrounding it resists movement in that direction ... only leaving options for the increased area to go up or down. It's easiest to remove area from the edges of your sheet of metal; in this case less area means the material gets thicker. Working separately or together shrinking and stretching create shape (check out the post on Shape vs Form and Arrangement for more detail on this).

The Bowl is made in 3 steps: we will go over the below in class on Wednesday, but the steps are recorded here as a reminder and as an aid to comprehension.

Top tip? Do the least amount of shaping to achieve the result you need. In other words, really think about it before you start going at it with a mallet or hammer. 

Step 1, Laser Cutting, Martin:

Illustrator and Autocad Files: Bowl Template and Female Radius Gauge

Laser cut the Bowl template consisting of a series of concentric rings ... you'll use these to trace around so you have a guide you can cut around for the 230mm disk and use the smaller ones to create guides for your hammering. It'll look like this:


Then ...

Create a female "radius gauge" to help guide and evaluate your progress. A female radius gauge is a concave curve in 2 dimensions that you can rest on your shape as it develops to test how far you have come and how much extra area you have to add. You have 3 curves to choose from; which one you use is up to you.


Once you've cut the disk from the aluminium make sure you file around the edges to "deburr" it (deburring is the act of removing any sharp edges) so you don't cut yourself.

Step 2, Shrinking and Stretching, Daniel:

We won't need to bend the material to make the Bowl, but so you have a complete understanding of the processes available to you the two diagrams below describe the mechanics of a bend.


If you choose a smaller radius to create a deeper bowl you will need to shrink the aluminium around the perimeter of your disk. Use the shrinking "stumps" (which, in our case, are depressions cut into slabs of plywood) and the mallet to create "tucks" in the aluminium sheet which you then hammer down into themselves causing the material to shrink (subtracting area) and thicken. Be careful not to hit yourself in the hand or jamb your hand between the aluminium and the stump below. See below:


Stretching adds area by making the aluminium thinner. You can do this by squeezing the aluminium between two hard objects (a hammer and dolly for example ... or the English wheel that you'll use in the next step) or unsupported over a depression (the depression in your stump for example) or with some support offered by a sand bag. The sand bag option is the best balance between speed and control. See the demo below:  


3. Planishing, Gabe:

While you can use a hammer and dolly to planish (smooth out or flatten) the lumpy shape you've created in steps 2 and 3 above its faster to use the English wheel. As I mentioned last week the English wheel works like a linear hammer ... squeezing the aluminium in lines rather than points. Watch out for pinching your fingers! See below for a demo:


Keep checking the shape with the radius gauge as it develops; your aim is to get the radius gauge to fit as best as possible to your finished bowl.

Regards

Russell


Monday, February 26, 2018

First Class: Introduction and Tours

Hi All,


Some images and notes to introduce the course:

We are Russell Lowe, Daniel Falzon, Martin Boehnel, Gabriel Undery.

You can see the course outline here.

Welcome!


Digital Making: by Computer, Smartphone, Machine and Hand

Perfect summary image: Form and Shape Comprehension

Interior

Architecture

Sculpture

Landscape

Industrial Design

Back to Automotive

Pattern making to understand form

Basic Tools! Stump and Mallet

English Wheel for Planishing


English Wheel: think of it as a long hammer

The Bowl

The Torus

The Tray

The Blister

Harley Davidson Sportster

Yamaha IT250

Custom Mesh using Grasshopper in Rhino

Photogrammetry in Autodesk ReCap Photo: Architecture

Point-cloud to Mesh

Landscape

Object

Autodesk Slicer for Fusion 360

3d Template 'Buck'